WHAT IS A NORMAL?
Basically, normal is direction vertex/polygon is facing.
HOW DO I BAKE NORMAL MAPS?
First things first. Understanding basic principles will help you to understand and solve different issues with baking, so please don’t skip this part. I will try to keep it as simple and short as possible.
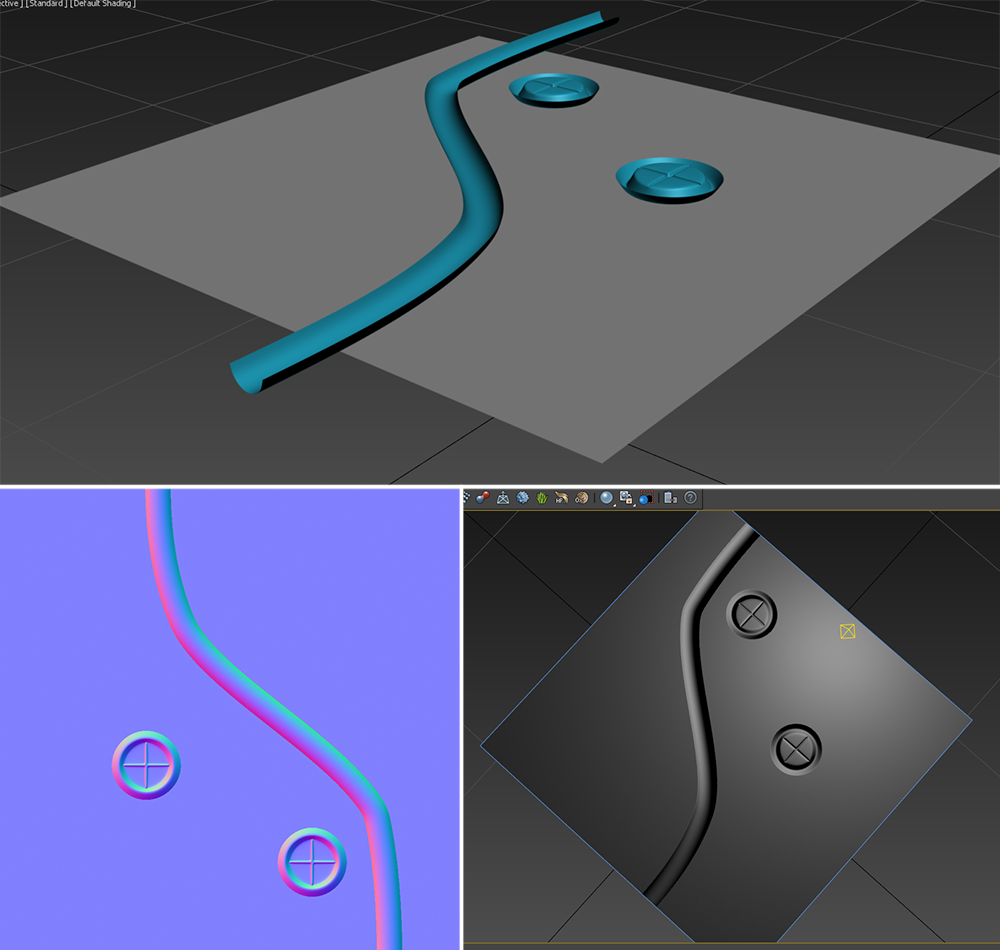
Prefered method is raycasting. You can use search distance which defines maximum distance rays can be casted to or you can use a cage which is prefered method. Cage is basically exact copy of your low poly mesh, must have same topology, same UVs and also must cover both of your meshes, low poly as well as a high poly. Copy of your UVW unwrapped low poly model with “push” modifier applied works in 99% of cases. Just keep pushing it until it will cover both meshes. During baking phase, cage will cast rays towards your meshes saving any differences between low and hi-poly as a RGB value, thus creating a normal map. Think of RGB information as a XYZ numerical value, rather than colour value.

BAKING

NOTE: If there will be any artifacts or white lines and pixels on your freshly baked normal map, just disable Global Supersampler and re-bake. Also, make sure to bake normal map at at least 16bit bit-depth, to avoid any artifacts.
MAKE SURE YOUR MESH IS PROPERLY PREPARED FOR BAKING NORMALS
Normal maps are very sensitive to smoothing groups and proper UVs. On next picture you can see different results using different smoothing groups and UVs.

NOTE: For normal maps, seams on the UVs MUST be on all hard edges, but hard edges doesn’t necessarily needs to be on all UV seams. What means you must create seams on all hard edges, but don’t need to create seams on soft edges. But seams on hard edges are MUST BE. Compressing normal maps with gradients can result in visual artefacts (like bad shading from specific angles…etc.).
NO-NO’S IN NORMAL MAPPING & HOW TO AVOID THEM
No-No .1: Easiest way to get a normal map is get an image and convert it in Adobe Photoshop to normal map. But mind that this is not proper workflow and final result will looks very bad. Photos and images can be used to create normal maps, but they need to be properly prepared first.
- 1. Picture of the metal doors is converted to normal map straight ahead. We can see that result is not what we are looking for. Hinges are imprinted into door instead of bumping out. Text on the paper is also imprinted into door and overal look is awful.
- 2. Picture was carefully prepared before conversion. Final result is much more realistic, hinges and bolts are bumping out, paper sign is a flat surface and letters are not imprinted into doors. It shouldn’t take more than 20-30 minutes for experienced Photoshop user to prepare image before conversion (but it depends on complecity of image).

No-No .2: Even Vs Steep. Even edges are another no-no in normal mapping. Make them a bit more steep to pronounce detail bit more.

No-No .3: Cilinders and round objects and how to get rid of “wave” effect on edges. Sometimes using copy of a low-poly mesh with push modifier as a cage is not enough. In this case, cage needs to be modified a bit.

ISSUES
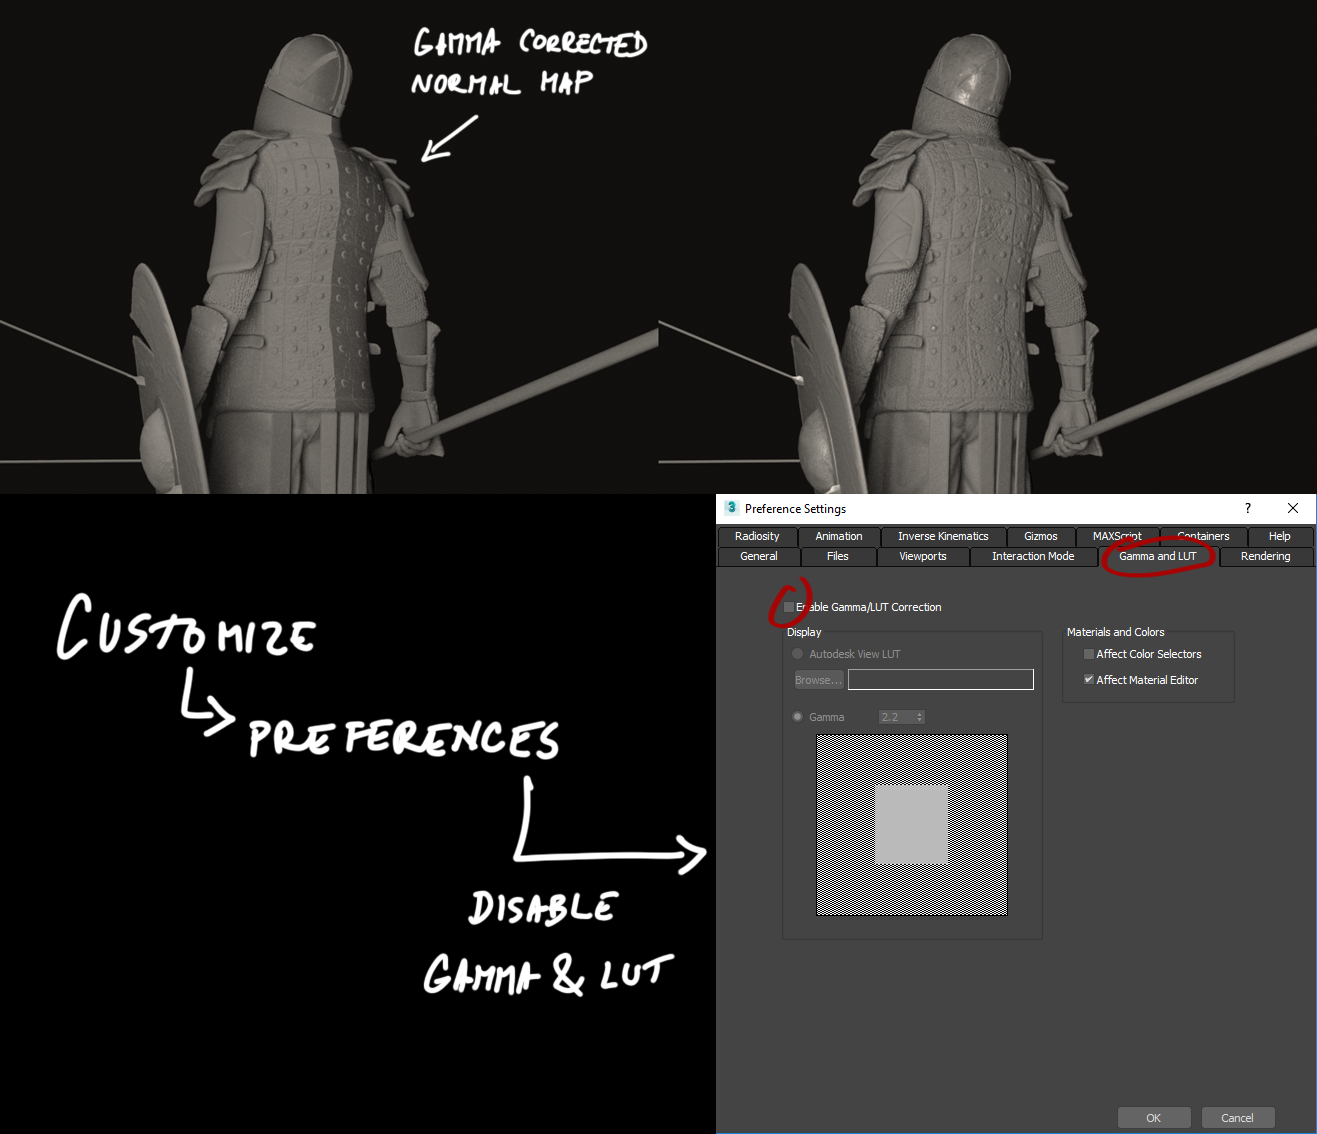
Issue .1: Normal maps are mostly video games related stuff, so sometimes they can cause a lot of troubles in rendering engines. Most common issue (at least in 3Ds Max) is caused by gamma correction as seen on the next picture.
Issue .2: My normals doesn’t looks right or looks inverted. 2 ways to fix this, flip green channel in Adobe PS, or easier way, just flip green channel right in the Normal2Bump (3Ds Max only) node in material editor. Depends on render engine, if it uses DirectX or OpenGL type of normal map. Engine like Unreal uses DirectX normal maps, while Unity 3D uses OpenGL. Both engines offers option to flip green channel in texture settings tho.

OTHER COMMON ISSUES
There are holes on some parts of my normal map: If you are using a cage for projection, make sure it covers both models and it is not intersecting with any part of low or high poly mesh. If you are not using cage, just set search distance to a higher value.
There is detail from other part of the model projected on my normal map: (example: A detail from upper arm is projected on side of the torso.) Make sure cage isn’t too big and doesn’t intersect with opposite polygons. If you are not using cage, search distance is too high, just set a lower value for it.
TIPS & TRICKS
FLOATERS: If you want to add some more detail on your hi-poly before baking, there’s no need to add 50 subdivision levels and billion edge loops. Easier way is to create small detail as individual object and just keep it floating a bit above your hi-poly mesh.