Let’s focus on environment for a bit. First thing that comes to my mind when talking about environment is nice and neat visuals, . But I would say that there are 2 main elements that create vide game environment, which I would say is visual aspect, and functional aspect as well. Everybody knows what visual aspect is, so I’m going to focus more on second one, functional aspect of the video game envrioment. It could include simple functionality like environmental story telling, arranging objects to tell a story of great battle, or ambush in a forest, a story which is communicated through the visual representation only, without a need of extra description in form of audio narrative or text. Secondly, it could include aspects that can directly affect game functionality/mechanics, like finding specific creatures or resources on some parts of the map only (crocodiles in tropical parts of the map, mammoth in arctic areas of the map…etc.) , or during the specific time of day (i.e. vampires during a night time, werewolves during a full moon only…etc.). Or we can even combine time of the day with a location. Let’s say you need “thick werewolf skin” to craft piece of armor. We know that we need to look for werewolves during a full moon only, but where to look for werewolf with a “thick” skin? Probably not in tropical areas, but rather in freezing, winter environment, where they have adapted to harsh winter conditions by developing a thicker skin that protects them from freezing temperatures. So this type of creature could be found in snowy forests during a full moon phase only. We could also include environmental story telling, to allow player find werewolf faster by placing some werewolf footprints leading to his den…etc. It would help to avoid frustration from spending great amount of time by looking for this specific enemy. Ok, enough talking, let’s jump on development part.
Environment – Visual Aspect
For a change, let’s focus on visuals a bit. Taking into consideration game setting, which is fantasy world with a bit of realism, I imagine dense forests, castles and ruins, remains of ancient civilizations…etc. So let’s start with the forest and floiage. First time I started thinking about creating a game ready tree, I thought “nah, easy, it’s just a trunk and branches with alpha cut-out”. Well, in theory, yes. But in practice, hell no. Making nice and believable realistic foliage that can run in real time is very complex process. Especially because it includes transparency, which is very expensive thing to calculate in real time, and as far as I know, it can’t be done using deffered rendering method, but only by using more expensive forward rendering. Ok, let’s get back to the trees topic. Let’s define first what makes trees and foliage believable. At first, it’s light scattering. A nice effect created by light rays passing through leaves, which is created using additional textures. Secondly, it’s movement (branches and leaves sway…etc.), which is created mostly through the shaders, using WPO (World Position Offset). At this point, knowing complexity and time needed to create enough foliage assets in high enought quality, I’ve decided to pay for a Speedtree license, which is very afordable for indie developers and would save me plenty of time. But, it wouldn’t let me sleep if I wouldn’t explore possibilities how to create such an effects.
Foliage and wind sway
As mentioned before, this is usually done through the shaders, by moving vertices. Let’s approach it as modelling or texturing process, primary detail first (offsetting a whole tree), then secondary (offsetting branches and twigs independently from tree trunk) and tertiary (offsetting twigs independently from branches). So first, i want to get wind direction, which we can store as Vector3 variable (but I’m going to use only first 2 vectors, disregarding Z vector). This variable tells me which direction wind blows on world X and Y axis, and will be used to define direction of vertex offset, and I’m also going to use another variable, wind strength, which defines amount of vertex offset. First thing I want to do is bend a whole tree depending on wind direction.
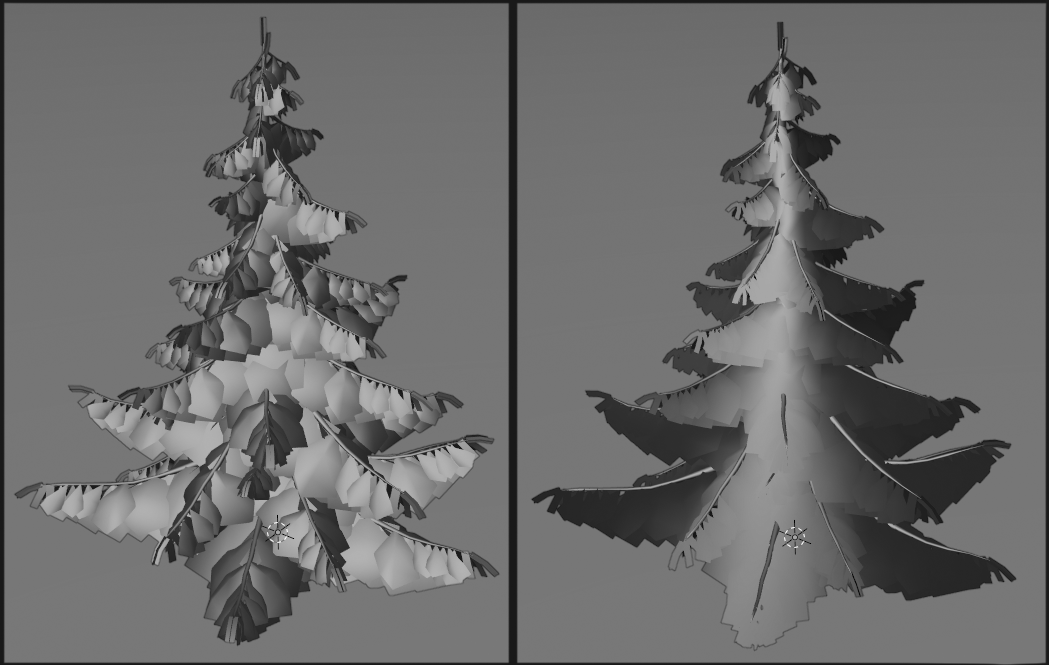
Offsetting vertices would basically move all vertices, what would result in offsetting whole tree (top picture). But I want tree base to stay on the place, like in real life. For this purpose I’m going to use simple gradient map, that would be used as mask. Think about gradient more like a “value” where black = 0 and white = 1, rather than a colour texture. Multiplying wind strength by gradient will result in moving vertices based on they distance from the tree base/root. Final result is definitely not what I’m looking for. Tree should bend, not tilt.
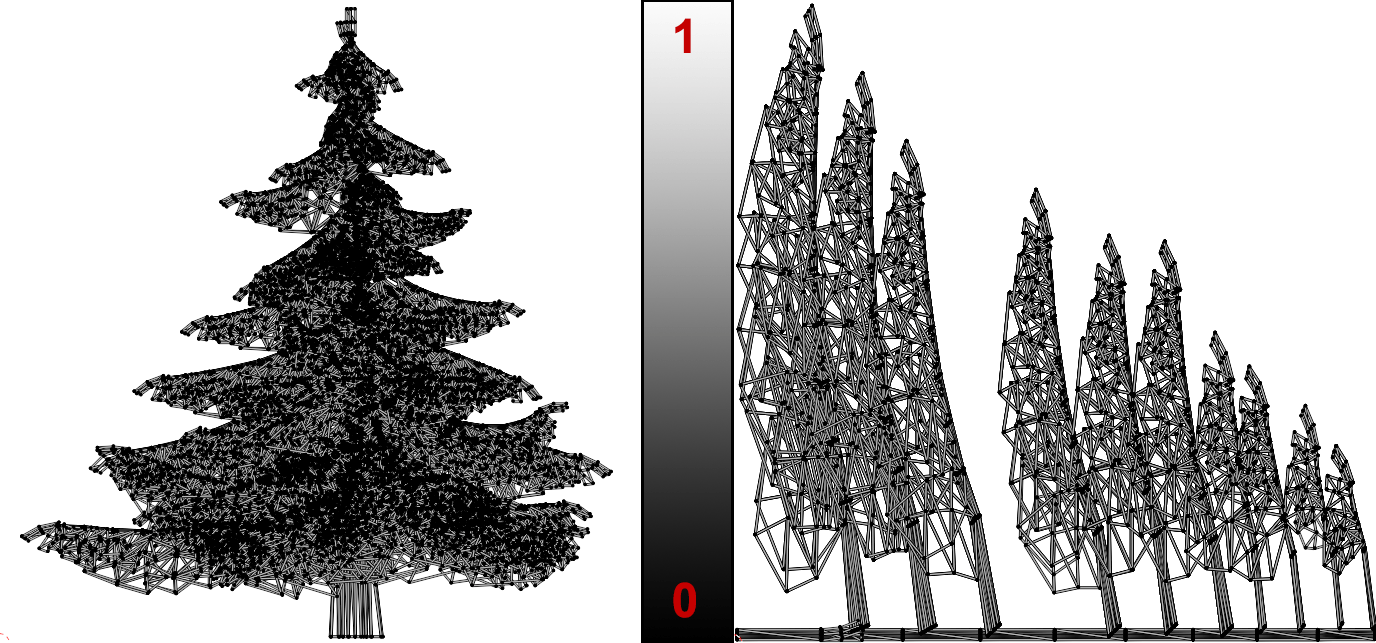
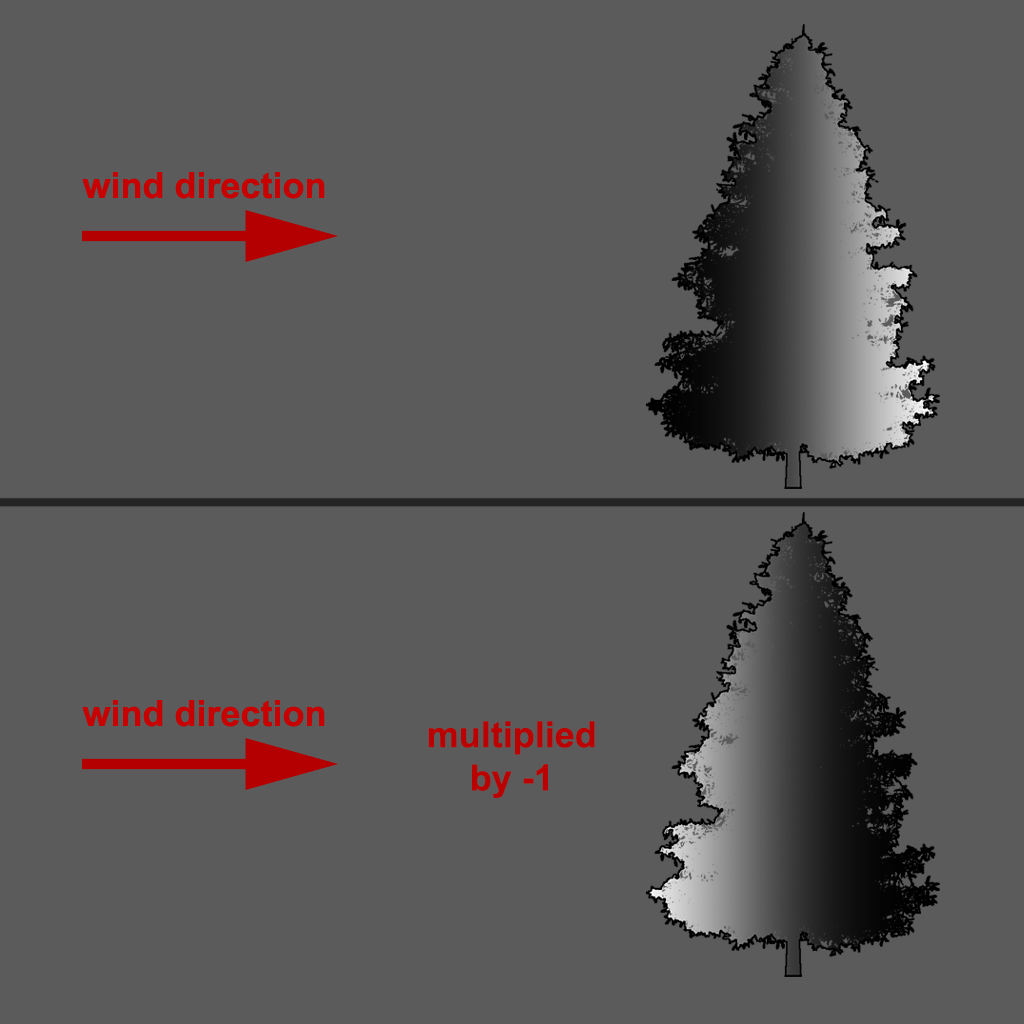
To fix it, I’m simply going to use “windStrength” variable to offset vertices on Z axis. Tree should bend down, towards the ground, so I’m going to multiply “windStrength” by -1, to get negative value, and this value will be used to offset vertices on Z axis. Same method will be used to bend branches and twigs, but using only X and Y axes. Now it’s time to prepare tree model for testing. For this purpose I’ve decided to use tree model with 3 different UV channels. First UV channel for texturing, second channel for bending whole tree, and third channel to bend branches and twigs independently from tree trunk. A quick tree mock-up created in Blender. Left image is model with original normals, and right image is model with all normals pointing outwards. This method helps to get nicer, smoother shading on foliage, and individual branch planes are not as visible. Next step is to prepare UVs.UVs are simple side flat unwrap. Overlapping faces doesn’t matter in this case. Simple gradient map is used as mask, and defines how strong effect “windStrength” variable will have on different parts of the tree. But, there is still one more thing that I have been thinking about. While one side of tree is directly exposed to the wind, other side is in cover, so it should not be affected by wind as much. As long as wind direction is not static value and can be changed, this can’t be done using simple gradient map. Well, in theory, using flat UV unwrap from top view and gradient map that is rotated based on wind drection, it could be done. But I’m going to do that by using object’s world position. So, at first I want to extract object’s world position (Absolute World Position – ObjectPosition), and then multiply this value by wind direction vectors (X and Y axes only). This will define which side of a tree is facing the same direction as wind (top picture). Last step is to invert this mask by multiplying it by -1 (or invert wind direction). Now this mask can be applied on branches and twigs. Very last step is to multiply final result by B&W noise map, that is slowly moving in wind’s direction (using world coordinates), to fake wind turbulence.
Custom tree sway shader, presented in UE4.
So everything works as expected, tree is bending, branches and twigs are swaying independently from tree trunk, and wind has limited effect on branches that are in cover, behind a tree. But, as I meantioned at the start of this topic, I’m going to use Speedtree, since I really don’t have a time to create rich variety of tree models. But it was nice to explore this topic and learn something new.
Optimization
Small note regarding performance and optimization. Since this method is using multiple UVs, we can simply create simplified versions of the material, and assign them to the different LODs respectively.
LOD0 – Highest detail, using 3 UVs. Tree trunk, branches and twigs are animated.
LOD1 – Medium detail, using 2 UVs. Tree trunk and brnahces are animated.
LOD2 – Low detail, using 1 UV. Only tree trunk is animated.
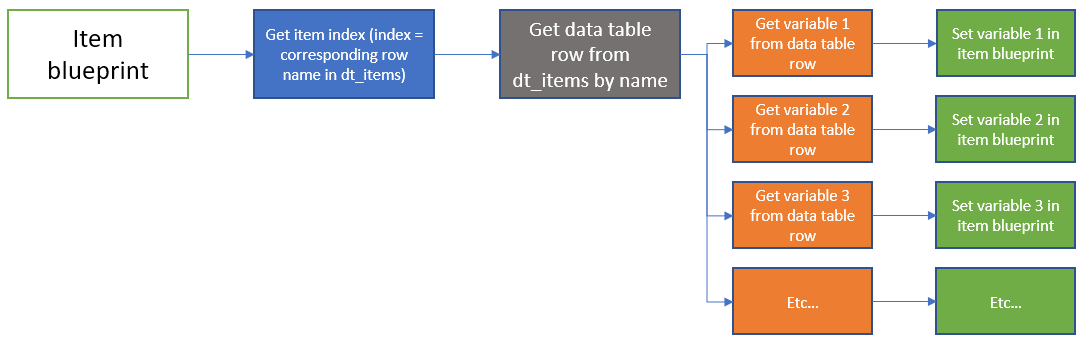
I’ve done a lot of changes in the past month, so this post will be a bit longer. First thing is to make all items/inventory system more localized, especially if I’m planning to implement crafting system. It is much easier to work with one file that includes all information, than scrolling through hundreds of items and looking for specific item. For this purpose I’m going to use DataTables. So first DataTable, “dt_items” is basically collection of items and uses same structure as ItemInfo “strut” file. Parent item bluprint can be also changed, so all information will be fed from dt_items data tbale.
Adding new item is now as simple as creating new row in dt_items data table. Row name is then used to set variables in item blueprint.
So all I need to do when creating new item blueprint, is to set item index corresponding to row name in dt_items. i.e. – I want to create a sword. Let’s say Sword is saved in 51st row in dt_items data table. All I need to do now, is set item index in item blueprint to 51, and all information is automatically extracted from row named “51” in dt_items, and used to set all variables inside item blueprint.
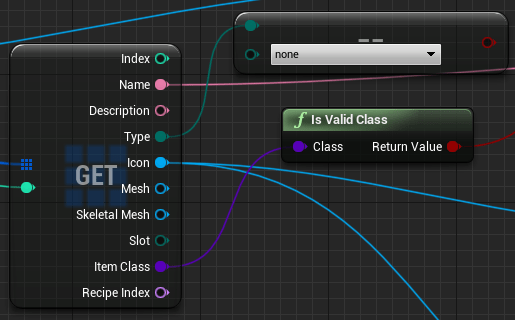
This will be especially usefull when implementing crafting system at later stage. But first I’ve decided to fix visual errors with inventory, so I can close whole “inventory episode” and focus on other things. Main issue with inventory system right now is that it is not showing correct icons for empty slots. I was able to identify cause of this error quite fast.
At first, I used “itemType” variable to check if there’s item of any type, to set icon in inventory…etc. Issue is that “itemType” variable is carried by item. That means if there’s not any item in the slot, “itemType” variable does not exist, what forces engine to use default button settings. So I’ve changed it to simply check if there’s something of any valid class in the slot. If yes, it will extract icon, text…etc. and use it to set variables in inventory window, if not, it will use empty slot icon.
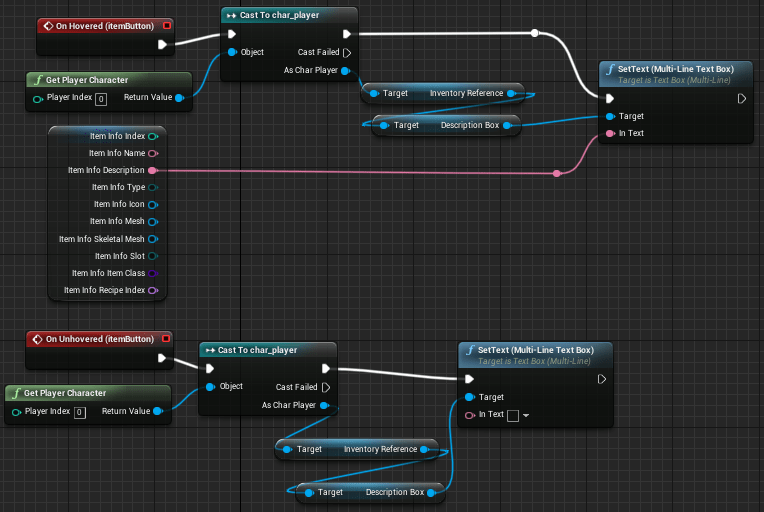
Now, when all inventory visual errors are fixed, I’m going to add few more widgets to inventory window. I just really want to close this inventory part. One thing I miss in inventory is description of the items. For this purpose I’m going to use “OnHovered” and “OnUnhovered” functions inside inventory button widget blueprint.
If mouse cursor hover over slot, it will simply extract “description” variable from an item and use it to set text in description window. When mouse cursor unhover, text is set to NULL. Just a basic function, but it helps to create smoother gameplay experience.
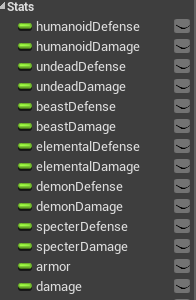
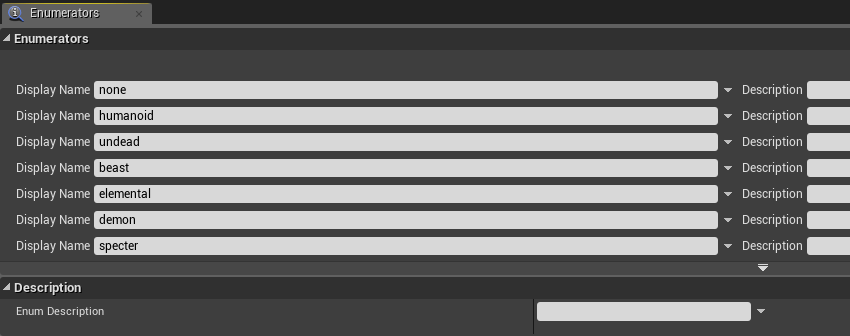
Part of the inventory systemis also equipment window, so if I want to finish inventory system, I need to add some more functionality to equipment window as well. One thing I miss right now is showing some more information about equipped items to player, which is important especially in RPG games, where player needs to equip proper equipment to fight different types of enemies. i.e. – I’m going to fight a boss which uses blunt attacks and also does magic damage, so I’m not going to use plate armour which is vulnerable to blunt attacks and has no protection against magic…etc. For this purpose, I’m going to create few more variables inside player character bluprint, corresponding to variables in “enemyType” enum. Currently having 6 different enemy types, I’m going to create “attack” and “defense” variable for each enemy type, plus armour and damage variables.
Latern, I can check towards these variables when applying damage to the player or to the enemy. I’m also going to use these variables to show some more information about equipment in equipment window, so player could actually see his/her weaknesses and strengths, and could properly prepare to fight different types of enemies. These variables could also be later used to apply temporary boost after drinking a potion, or apply debufs when injured by enemy…etc.
Crafting System
So now, when inventory and equipment system is finally done (there probably will be some visual changes later, but I’m talking about functionality now), I can finally focus on other aspects of gameplay. for crafting system I’m going to use similar system as is used for inventory. All recipes will be fed from data table with simple structure. Structure should define what items in what amount player need to craft chosen item. I want to keep it simple so I’m going to use maximum of 3 different items to be required to craft item. Now it is time to thing how chosen game design affect this element of the game itself. A lot of games use crafting time when crafting items, so player need to wait specific amount of time for item to be crafted. But I’m not planning to use crafting time, for simple reason. In multiplayer survival games, players need to rely on how fast they can gather resources and craft items, so they can compete with other players, but since this game is single player only, crafting time would just create unnecessary frustration for the player. Making player to wait for something, when there’s nobody to compete with, is not a good idea. So no crafting time in this game. I also don’t like idea of player character carying 1500 wooden logs, 500 iron bars and 3000 stones, so no items stacking.
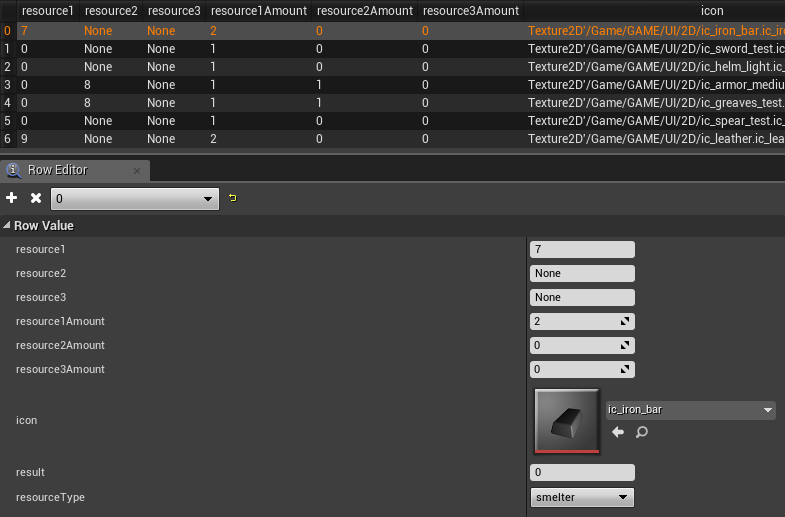
Simple recipes data table, which will contain all existing recipes when game is finished. Resource1,2,3 variables defines which resources are required to craft an item (these variables are basically a name of the row in the dt_items data table). Amount1,2,3 defines how many of these items are required. Result variable defines which item is crafted (this variable is also a name of the row in the dt_items data table).
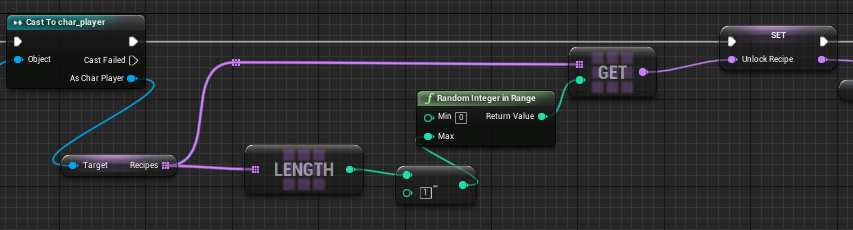
There needs to be some system for learning recipes first. Now, it’s time to talk about game design once again. In some games, every recipe stops spawning as soon as player will learn it, in other games same recipe is being spawned regardless if player has learned it or not. Once again, it depends on game design. In multiplayer games, second method is better choice, since you want to all players to be able to learn all recipes, and moslty, to make game more competitive, by making player to spend great amount of time to find all recipes. On other hand, in single player games, it would be frustrating for a player to spend hours looking for the specific recipe. For this purpose, I’m going to use 2 arrays, “recipes” (to store all recipes from dt_recipes) and “unlockedRecipes” (to store all learned recipes), and I’m going to create one more actor for recipe. Recipe function is simple. Once recipe is spawned, it will pick random integer in range 0 -> recipes arrayLength, and store this variable. When new recipe is learned, item is moved to unlockedRecipes array and removed from recipes array. This way, player won’t be frustrated by finding already learned recipe over and over again.
Simple function for generating random recipes from “recipes” array. “unlockRecipe” variable is basically a row name from “dt_recipes” data table. Oncle player click on recipe in inventory, this variable ise moved to “unlockedRecipes” array and removed from “recipes” array.
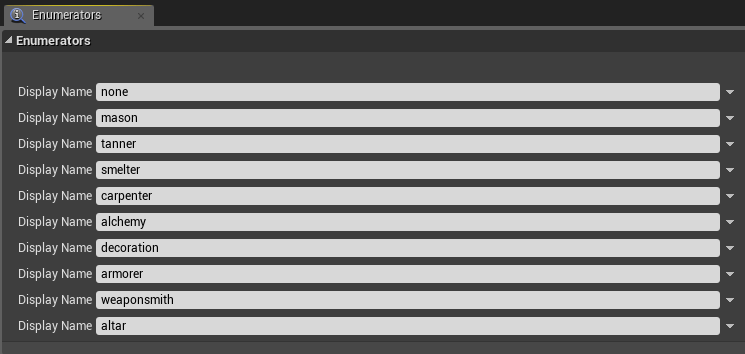
Now, I need to think about actual crafting function. I wanted to keep this game as simple as possible, but I really don’t want to use one table to craft all items, so I will need something that will idetify different table types. Most logical option (at least from my point of view) is to use enumeration. Simple enum where you can pick type crafting table (armorer, weaponsmith, smelter…etc.). Now it’s a good time to rhink about game design again. What items I need player to be able to craft, based on defined design? Armours and weapons is must be. It’s also partially fantasy themed game, so probably some potions and amulets. I’m also planning to implement simple building upgrade system, where player can upgrade his/her house, so I can also add carpenter and mason table…etc.
Final “ETableType” enum. Both, crafting table as well as recipe are carriers of this enum.
When player interact with crafting table, it will simply check it’s type (ETableType), and compare this variable to all items in “unlockedRecipes” array. If “table type” == “recipe type”, recipe is added to table recipes inventory, so armorsmith table will show only recipes tagged as “armorsmith”, smelter table only recipes tagged as “smelter”…etc.
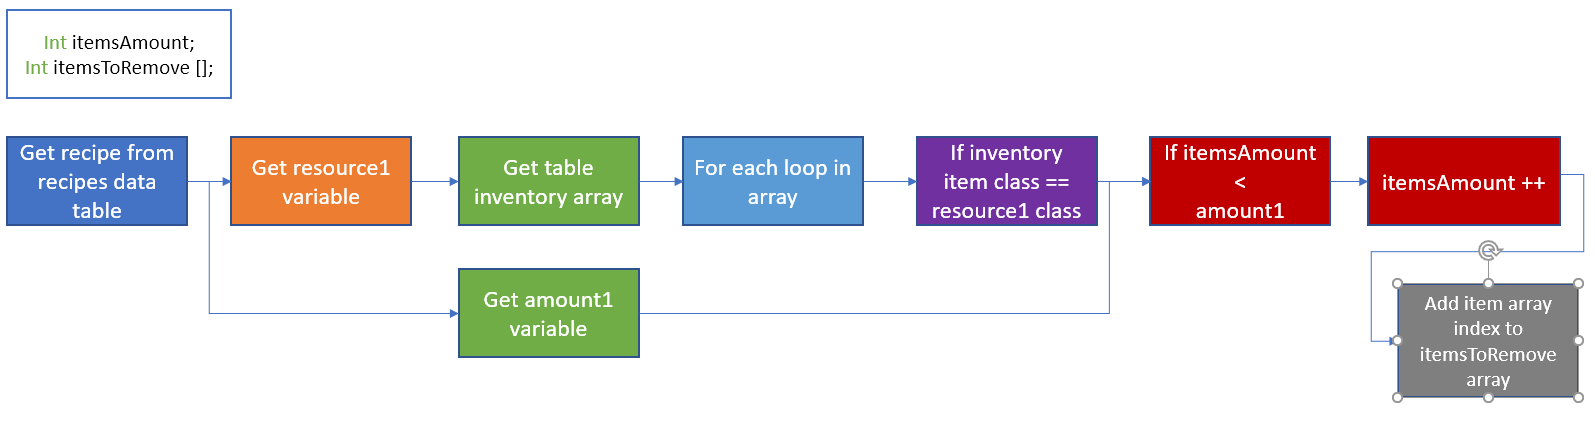
Last part I need to do (in terms of crafting functionality) is to create a function that would check table inventory for items required for crafting.
Checking table inventory for items required to craft specific item is done simply by comparing items class. As long as items in recipe and inventory are same class, this check will pass. Items of other clasees will be ignored. Issue is that if I need, let’s say, 2 iron bars to craft a sword, and I have 5 iron bars in inventory, all 5 iron bars will be added to “itemsToRemove” array. So I’m going to add another check, that will stop function as soon as required amount of items is equal to variable defined in “dt_recipes” data table. This way only 2 iron bars will be added to “itemsToRemove” array.
Logic behind deleting items from table inventory, which is executed if items required for crafting item are present in table inventory (if previous check passes). “itemsAmount” variable needs to be reset to 0 and “itemsToRemove” array also needs to be cleared before crafting another item.
Now just create UI for crafting table and all is set and ready for testing. So let’s recapitulate whole process of recipes learning and crafting. So, once recipe is spawned, it will check “recipes” array and pick random index. When player learn recipes, variable stored under this index in array is moved to “learnedRecipes” array and removed from “recipes” array (to prevent player from finding already known recipes and thus creating unnecessary frustration). When player interact with crafting table of any type, table type enum variable “ECraftingTableType” is checked against same enum variable stored in recipe. If table type == recipe type, recipe is added to the crafting table, so player can craft specific items on specific crafting tables only (i.e. armours on armorsmith table, weapons on weaponsmith table…etc.). If crafting an item, it will check if all required items are in inventory in required amount (fed from “dt_recipes” data table). If not, do nothing, if yes, craft an item, remove used resources from table inventory, then add crafted item to the table inventory. In regards of crafting table UI, I’m going to add one more widget that will show requirements for crafting an item when mouse cursor is hovered over the recipe button in crafting table UI. So, that’s should be all for crafting functionality, from now on, every item added to the “dt_items” data table will be present in game and every recipe added to the “dt_recipes” data tabe will be used in game as well. Let’s test it.
Everything seems to work properly. (for now).
So, at first I’ve fixed visual errors in inventory window. Icons in inventory are being updated correctly now. Description widget was also added to show description of items when mouse cursos hover over an item in inventory. Each equipped item (armour or weapon) now updates Attack/Defense values against specific enemy types, which is also shown in equipment window. Crafting tables and recipes were also added to the game as well as crafting functionality. Everything works for now, but that’s just a part of the game creation. Another challenge will be to balance everything at later stages of dvelopment, to create smooth gameplay experience. I don’t want player to know all recipes after 1 hour of gameplay, but on other side, I don’t want player to spend weeks to find recipe or to craft first item. Everything needs to be balanced in regards of player’s character development. Crafting strongest weapons while meeting low-level enemies would make game too easy and boring, while fighting high-level enemies with “wooden training sword” would create great amount of frustration. That’s where testers come into action. I will need someone to test gameplay, after prototype and few test leves are finished. Easiest and cheapest way is to ask friends, but mind that friend’s feedback is not always honest feedback.
Footnotes
Localization – A lot of information could be also fed from external files, like CSV, which is more suitable to store text information. Feeding data tables from CSV files will make it easier to create localization to other languages. i.e. – If selected language = english, feed DataTable from english.csv, if selected language = spanish, feed DataTable from spanish.csv.CSV file could be simply sent to someone else for translation.How many languages game will include, depends on how much money will be pledged on Kickstarter.
Enemies grouping – to make fighting enemies a bit more interesting, I’m planning to create enemy rosters, where enemies could be spawned in a way that they could help each other. i.e. – werewolf, which is “beast” type of enemy, could be sometimes spawned together with some other enemy that gives debuf to “beastDefense” stat…etc.
Enemies attack patterns – a lot of games uses specific patterns for enemy attacks (i.e. – after attack1, there’s going to be attack2, then attack3…etc.), which allows player to easily adapt and learn these patterns. I’want to experiment with random attack patterns, where each continous attack is picked randomly from an array. This way player would need to rely more on skills and perception, rather than smashing buttons in specific order.Speed of enemy attack animations could be multiplied by variable that depends on chosen game difficulty.
Blocking – to make combat system even more interesting, I want to try implement blockng system similar to the one in Kingdom Come: Deliverance video game, where player need to press “block button” and move mouse in direction of incoming attack, to successfuly block attack. Block animation could be also multiplied by “blockingSpeed” variable. Each succesfull block will add some value to the blocking speed, to imitate learning and training, rather than simply rely on unlocking skills in skill tree. Blocking speed variable could be also split in 3 different variables, based on EAttackType enum (swing, blunt and pierce – i.e. – blocking with swords, maces, spears…etc.). I could also possibly use same system for attacking, delivering succefull blows will increase attack speed with specific weapon type. Just thinking that I wanted to keep this game simple…
Game difficulty – I’ve been thinking about something different for difficulty options for this game. As we can usualy see in many games, higher difficulty means more hit points and higher damage for enemies. That’s really not what I want to do. I’ve been thinking about something more sophisticated. As mentioned in this Footnotes, I want player to learn how to use weapons by fighting…etc. So enemies could possibly do the same. I can use difficulty setting as a variable (i.e. EASY = 0.8, NORMAL = 1, HARD = 1.2). Enemy animations then can be multiplied by this variable, so on hard difficulty enemies would have higher attack speed…etc (i.e. “attack1” animation speed = difficultySetting). That would force player to train and fight more, to attack faster and to deal higher damage. It would also force player to use greater amount of perception and concentration when fighting enemies (i.e. player will need to focus more and react faster when blocking incoming attacks…etc.).
Back from nightsift, with stamina replenished after some sleep, I can continue with development. 3 days off ahead of me, so wohooo.
I’ve been thinking during my shift about last post, and realized it would be good idea to talk a bit about naming convention. It is not an issue at this stage, while having very few object types, but it will help to avoid a lot of headaches at later stages. Looking for specific object in 100 objects named “TestObject001” to “TestObject100” is not best way to go. I like to use simple naming conventions, like t_ for textures, dt_ for data tables, sk_ for skeleton, skm_ for skeletal meshes, sm_ for static meshes…etc. For an instance, “t_sword_steel” and “sm_sword_steel”, so I’ll know this texture belongs to this object, and it is also makes refering to objects much easier as well. Ok, let’s jump back to UE4 engine.
So now, when picking objects and simple inventory is implemented, it will be good idea to make use of them. From previous post we know that object is simple collection of variables that is being moved between world and character’s inventory (for now). So, I’m going to approach using items same way as I did for picking items. Now, when all information about picked object is stored in inventory slot, I can use it to use or equip item. By clicking on item, it will extract required information and use item (or move it to equipment slot in case of armour or weapon).
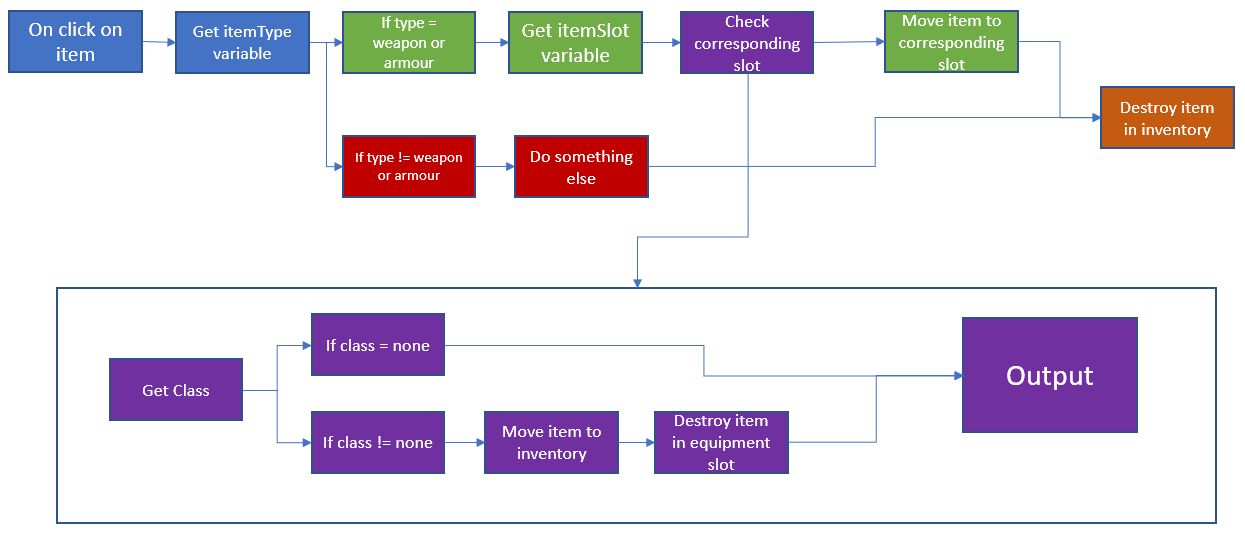
So basically we are still moving our collection of variables between inventory and equipment slots. “itemType” variable is used to check type of the object, and based on its type I can execute different functions. We don’t want to end up equipping iron bar or stone as a helmet. If object type is “armour” or “weapon”, it’s going to check “itemSlot” variable, which defines in what slot item should be quipped. Object in inventory is then destroyed. If object is of other type, it will do something else.
Nah, just realized we want to swap equipment items as well, so I need to modify this function a bit. But core idea stays the same.
Now it is done. So if there’s item of any class in, let’s say, helmet slot, and we want to equip helmet from inventory, it will move equipped helmet to inventory, and then equip helmet from inventory.
So that’s the basic function logic for equipping and using items. Same function logic is used to unequip items, with one exception only. If unequipping items, we need to check if there’s space in inventory first. If inventory is full, character simply can’t unequip item. It seems that there shouldn’t be any issues with switching items, since we are moving one item from, and on item to inventory. Hovewer, there are som exceptions, like 2 handed weapons. Let’s say my character has sword in primary hand, and shield in secondary hand, and I wan’t to equip new super-awesome 2 handed sword I just found. In that case we are moving 2 objects to inventory (from both hands), but only 1 object from inventory. So if inventory is full, equipping 2 handed weapon in this case should not be possible. Ok, I’m just talking about nothing now, let’s jump back at prototyping.
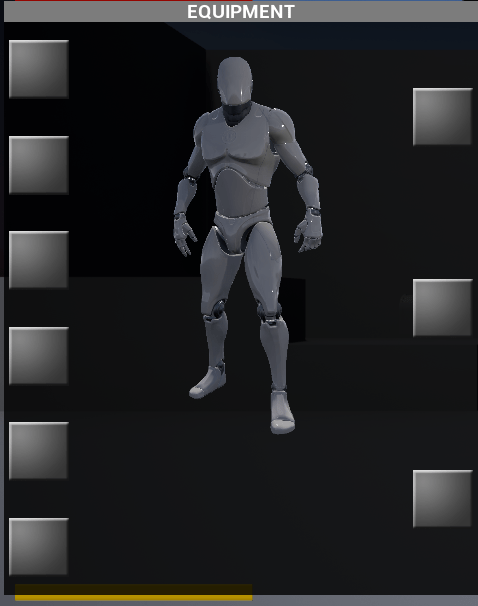
Well, now I need new UI widget for equipment window, something simple for testing purpose. In this case I’ve inspired myself by modern video games, where instance of player character is being rendered inside inventory/equipment window in real time.
Simple equipment window with few slots and a player character instance being rendered in the center of equipment window. There’s some antialiasing issue on the rendered character, but it should do the job for now.
Took an inspiration for equipment window from Conan Exiles video game. I’ve actually learned a lot thanks to the Conan Exiles DevKit provided by Funcom, as well as from watching many tutorials provided for free by other professionals (Jackson from TitanicGames is my favourite). But remember, copying and pasting chunks of code is strictly no-no, tutorials should serve learning purpose, for one to understand principles so one will be later able to use knowledge to create own art or code.
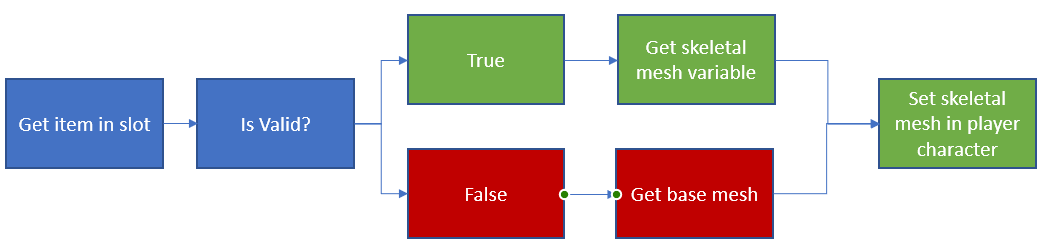
There are 2 more things I want to do before testing. Character render inside equipment window should represent player character in the game world, while character in the game world should change appearance based on equipped armour.
Logic behind swapping models on segmented character mesh. i.e. get item from torso slot, if there is any item in the slot (IsValid?), it will get “skeletalMesh” variable and use it to set skeletal mesh for torso. If there is no item in the slot, it will set base mesh as a skeletal mesh for the torso. Character instance rendered in equipment window can take input from player character or directly from equipment slot (what would be more logical, since character instance in equipment window exist only if equipment window does).
Well, there’s actually one more thing I want to do before finishing this post, to close this “inventory episode”. So while messing with inventory system, I’m going to add one more thing, which is storage items like chest, cabinet…etc. It is basically same system, but with one difference. Each storage object having its own inventory and with multiple storage objects in the game world, I need to make sure game will display inventory only of storage item player is interacting with. For this purpose I’m going to use simple collider, which defines interactable area of storage object, one more variable which defines which specific storage object player is interacting with, and also array “storageInventory” which holds all items in the storage.
Storage object consist of 2 meshes (top and bottom part) and one collider to detect if player can interact with chest. On interaction event, top part of the chest will open and chest inventory UI is displayed.
So basically I cast to player character, getting highlighted object variable, which is set by collider (onCollisionEnter / onCollisionExit). Next cast is to the storage item class, where highlighted object defines which specific storage object player is interacting with. From there I can extract required information, like inventory variable, storage size if I want to have more different types of storage objects with different capacity…etc. All these variables are then used to create storage inventory UI window.
So let’s test it now, everything should work (hopefully) and this episode can be closed.
So everything works (for now). Items can be picked, equipped/unequipped, player changes appearance based on equipped items, each storage chest has it’s own inventory and capacity…etc. That’s hopefully basic inventory/storage system done. But I will probably get back to it later (I’m sure I’ve forgot something that will come up later). Now just add some footnotes and that’s me done for now.
Footnotes
enemy inventory system – not going to implement inventory system for enemies. I will probably use simple array of objects that enemies can drop once killed. So I will need to add one more variable to item variables collection that defines chance of item being dropped by killed enemy (for each item in enemy inventory array, get “dropChance” variable, perform roll, if “dropChance” => random integer in range 0-100, spawn item)
Crafting system – have a look at crafting system. Thinking about few types of crafting tables (can possibly use itemType enum from item variables collection). Have look at recipes system also (could be learned? Unlocked by skill? Dropped by enemies? Need a specific NPC character to craft items, i.e. armorsmith, weaponsmith, alchemist…etc.?).
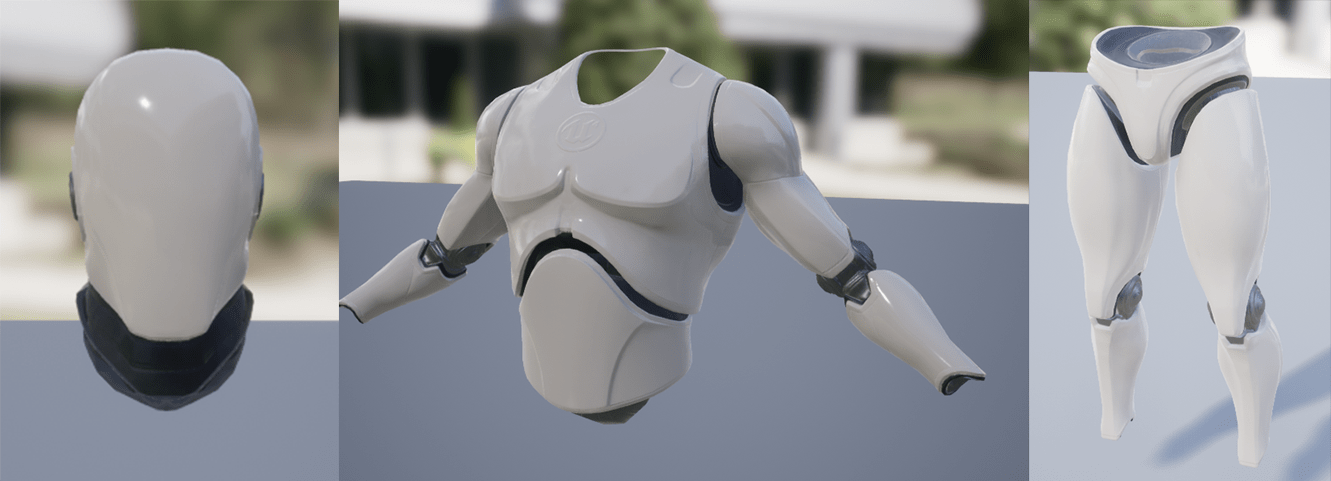
Rapid prototyping is the first step on this, let’s name it “Road of the Development” to keep RPG theme, and its purpose is straightforward. Implement basic functions as quick as possible. Polished, fancy looking 3D assets are far away at this stage. So first step is to implement main character. Changing armors and weapons is inseparable part of RPG themed games. To allow player dress hero to their taste. “I’m in a good mood today, I want to be a paladin that help others in these hard times.”, “My boss has really pissed me off today, I’m gonna wear dark steel armor and smash everyone I’ll meet during my journey today!” and so on… Implementation of such a system depends on ones experience and knowledge, as well as preference. I’ve decided to use segmented meshes to avoid, or at least minimize, clipping issues with meshes (). Function logic is simple, just switch meshes when new armor or weapon is equipped. For rapid prototyping purpose, I’ve decided to use mannequin which is included in UE4 Engine. Once it is properly set up, one just need to swap meshes for finished assets and it should work.
Example of segmented mesh. You can cut mesh to as many parts as you want, depends on game design and mechanics.
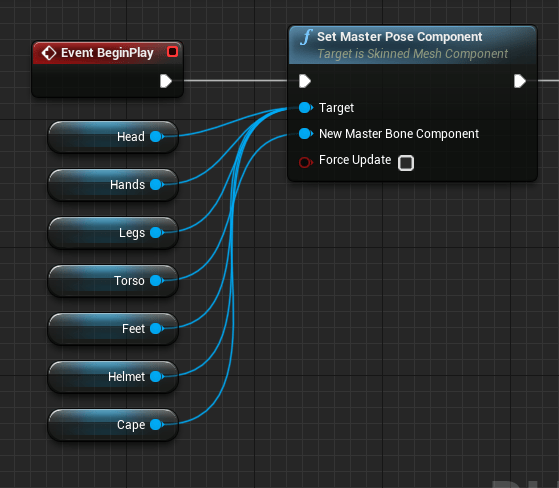
Simple setup inside UE4 engine. You can add as many components as you would like to. Beard or hair meshes, if you want allow player to customize character a bit…etc. Note that cape, depite being an aror parts, have their own slots. Head, as well as helmet, is non deforming mesh, unlike other body parts, so chances of clipping artifacts are minimal. Cape, on other hand, is going to be driven by PhysX cloth simulation, and there will be some clipping no mater what you do.
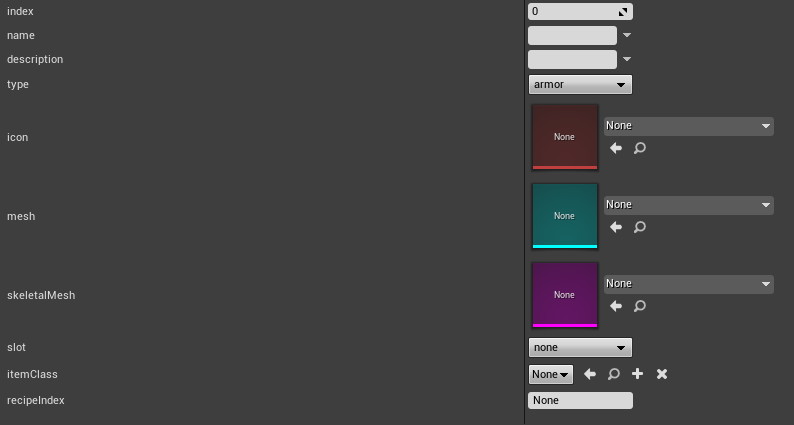
Base character setup is basically done. Next step is to create some assets, like helmet, armor, weapon, and test how it works. But first let’s talk about what in-game object is. Disregard 3D mesh now, and let’s talk about in-game object itself. Let’s say, piece of breastplate. It not only holds information about what 3D mesh has to be loaded and rendered, it also holds other variables as well. Object class, armor value, weight of armor, basically whatever variable you want it to contain. So we can say that in-game object is basically a collection of variables, where each variable carry some information about object. So what we want to do now, is basically create structure of variables we want to use for in-game objects. In UE4 it is called simply “Structure”. Inside structure file you can add as many variables as you wish. My structure file looks like this.
Each in-game object that uses this file will contain all these variables. All these variables can be later changed or accesed to extract required information. i.e. Picking object from the ground will transfer these information to your inventory slot, and use “icon” variable to change appearance of inventory slot. If breastplate is equipped, game will access skeletal mesh variable and swap currently equipped mesh for new one…etc.
I’m thinking about adding a crafting system at alater stages as well, so I’ve decided to add “recipeIndex” variable for later use. Still trying to come up with new game mechanics that could be add to the game, but need to set up basic functions first. Collider added to actor component detects collision with player character , allowing player to interact with object, using simple bool check that is switched to true/false using onCollisionEnter/onCollisionExit. Inventory system works basically as described on image above. If object enter collision with player character, player can interact with said object. Above mentioned variables are then moved from game world to inventory slot and actor is deleted from the world. For this purpose, we need to add few more variables to player character. Variable that holds information about item, array that holds information about all items in inventory, and I’m also gonna add integer variable that defines inventory size. “inventorySize” variable will allow me to modify player’s inventory capacity at later stage, let’s say, through unlocking required skill in skill tree, or wearing armour that allows player to carry more items…etc. I’m not going to implement that mechanics righ now, but it is good idea to think forward. The key (at least in my opinion), is basic logical thinking. What I want object to do on interaction? What actors/objects depend on this function/variable? Sometimes it helps me to simply use power point and visualise what I want to do in logical order.
Simple visualisation of logical order. Sometimes it helps me to see what exactly I want to do. I use this quite a lot, especially when designing advanced shaders/materials. Try to think logically, i.e. If I move “Destroy Object” function before “get variables”, it won’t work, since object carying these variables was destroyed before and doesn’t exist anymore. It’s just a very simple example, and it will get messy at later stages, where one function depends on 10 different variables from 5 different objects…etc.
This simple function should move item from world to inventory. But inventory does exist only on blueprint level for now, so next step should be to create invenotry UI. For this purpose I’m going to create simple inventory window and populate it with buttons. Buttons allows us to detect collision with mouse cursor, change appearance on click on button, on “mouse over”…etc. (this also gave me an idea of another game mechanic I can implement later. That’s where notepad comes handy.). Now, “inventorySize” variable from player character comes handy. “inventorySize” basically defines how many slots will be in inventory. Simple logical function described above should now move item from world to inventory.
Do not forget to add simple check if there’s a sapce in inventory. Simply by getting amount of objects from inventory array and compare it to “inventorySize” variable. If inventory “arrayLength – 1” = invenotrySize, there’s no more space in inventory.
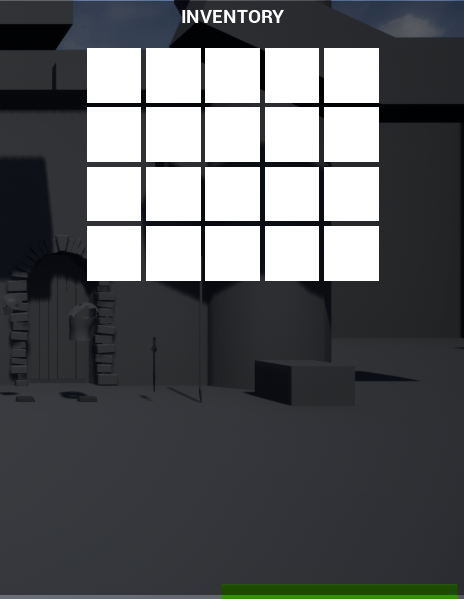
Simple inventory window, populated by buttons that will hold information about items. Note the empty space at the bottom half. It’s going do be used to display description of item when mouse cursor hover over the item in inventory, simply by getting “description” variable from variables collection I’ve created before. It should work.
Picking items should work now. I’m not going to create fancy inventory slots and icons for items at this stage. There’s simply no reason to waste a time on creating fancy graphics just to find out that inventory system is broken. Creation of detailed, polished assets and graphics is still far away. Nice looking, but broken game is still a broken game. Still need to implement function that will increment item position in inventory if slot is already taken. Simple check should do the job. Since picking object will transfer all variables from the object to inventory, we can check if slot contains object of any class. If there’s object of any class in the slot, it will simply increment position of item in inventory.
Simple check if slot is taken. If it is taken, it should increment position by 1.
So let’s drop some test objects to the game world and pick them up.
It works (surprisingly).
So that’s picking objects done for now. I’m going to add few more variables to the player character before embarking for nightsfit again and will continue later (got 3 days off after this shift, wohooo). I’m gona add float variables for health and stamina, and since it is going to be fantasy themed game with RPG elements, I’m going to add variables like armour type, enemy type, weapon type…etc.
So, for weapon type, enemy type…etc. I’m going to use Enums. It will help me to implement some fighting mechanics at later stage, i.e. Higher damage against specific type of enemy for weapons, better defense against specific enemy types for armour pieces, potions to increase specific damage/defense…etc. Took a bit of inspiration from Witcher 3 video game for enemy types haha.
So that’s me done for today, just going to put some footnotes here and that’s it.
Footnotes
World map – creating inventory window using buttons has given me an idea of world map and functions related to travelling. Populate world map with invisible buttons that will execute different checks on collision with player’s icon traveling through the world map.
Locations – Reveal location on world map on button collision with player icon
Hidden locations – on button collision with player icon, get “perception” variable from player and perform roll to reveal hidden location (i.e. player’s perception = 10, get random integer in range of 0 – 100. If player’s perception => random integer, location is revealed on the map)
Secret locations – perform same roll as above, but only if player has certain skill unlocked. (possibility of use of easter eggs?).
Need to test it first. But at a later stage, after other, more important mechanics are implemented.I’m just going to leave it here for now, and will return back to it later.
Depends on purpose of the project, planning stages could differ, but they have one in common. Research. If I’m planning to learn something new, create small game for portfolio, or more complex game and try crowdfunding, we should still perform complex research to answer more questions. Main focus of this project is crowdfunding, so main research will focus on:
Audience – who is the target audience? If you are starting a project to learn and expand your knowledge, you can disregard this question. But in other case, it is important to know your audience and what they would like to see in game. What game functions they would like? Do they prefere cartoony, cell shaded graphics or realistic? Do audience like to solve complex puzzles or prefere to jump through levels? Do they want to play a game just to relax after working day, or they wants story driven game, where they can create bond with main protagonist and hate antagonist? Do target audience prefere PC, console or mobile gaming? Target audience basically defines all aspects of your video game.
Projected sales and revenue – this one actually consist of more sub-questions. First step would be to research similar games, to see how much copies they have sold…etc. How much tax do you have to pay in a country you are live in? What platforms are you planning to sell your game on? Is there interest for a games like one you worknig on on chosen platform? What game engine should I pick to build my first video game? All these aspects will affect final profit. For an instance, using UE4 engine will commit you to pay 5% royalties to EpicGames ,inc. Releasing your game on EpicGames platform will cost you 12% for sales on this platform (as of December 2020). Releasing game on Steam platform will cost you 30% of your sales. How many copies games sell in average on chosen platform? Advertisement, another additional expenses. How do I want to advertise my game? Using advertisement agencies? Paid ads on websites? Youtubers? All is going to add to your expenses.
I’m trying to be realistic, and at this stage I’m planning to raise £15 000 – £20 000 using crowdfunding. If succesfull, I could invest some money into new equipment and probably to hire one or two people to help with the final stages of development (for about 5 months). Money from crowdfunding will be used to finish game development, and money from sales (if any), will be used to fund studio. There is still question on expenses for software packages required for development. That’s where your support job comes into action. Literally writing this post couple of hours before embarking to 10 hours long nightshift. Luckily I’ve made some investments during my study, so I do have commercial licenses to some software packages like Zbrush, Substance Painter and Designer, Adobe PS…etc. which basically covers all requirements in regards to high-poly modelling, texture baking and texturing. Still can’t afford to pay for Autodesk 3Ds Max license or subscription (which is my favourite 3D package), so I will need to use Blender for retopo, rigging and animating, which is free and open source. I don’t have much experience using Blender, but it’s about workflow, not about knowing UI. Same tools, different names, so it shouldn’t be too difficult to transfer workflow from one package to another.
About game design
At this stage, there’s no much to define about game design, other than basic information, like game genre, art-style…etc. Decisions were made based on research and other aspects as well.
Setting – fantasy world.
3D side scroller with RPG elements – Why side scroller? Well, while I would really like to make this game in 3rd person view, it is just not possible for one person to handle all complications coming with 3rd or 1st person camera view. Sidecsroller allows me to skip creation of LODs and optimization issues coming with 3rd person camera view. And why RPG elements? Game is set in fantasy world, which strictly depends on these elements. However, because of limited team size, consisting of 1 person (me), RPG elements will probably consist of simple skill tree affecting attributes like attack, defense…etc.
Artstyle – I’m not gonna say realistic, but rather more realistic than stylized. Something like stylized shapes for some monsters and objects, but with realistic surface finish, if it makes any sense?
Platform – For now it is a PC. While PC is not preferable platform for games like this, I have no experience with porting to consoles at all. I would say it depends on funds raised. If it would be possible, I would like to port for consoles as well.
Game mechanics – While 3D sidescroller, game also incorporates RPG elements, what means implementation of inventory and skills system, which could be pain to implement. For controlls I will probably build on 3D platformer template included un UE4 starter pack. No specific plans for fighting mechanics for now.
Story – Since it incorporates RPG elements, video game should contain at least simple story line that main hero can follow. I do have a basic idea for the story for now, but it will probably be amended during development.
That’s me done blocking out very basic idea for the video game. Plenty of new, and more in depth ideas and mechanics will come up at later stages, during development. Ideas coming up all the time, so it si good idea to have some notepad at hand all the time (or hell of a memory to remember everything). Next step is to start messing up inside chosen engine, in my case UE4, and start prototyping.
Waiting for a first job in games industry could be frustrating, especially if you are a creative personnel and have to make living doing a job that is completely unrelated to video games development. To feed my needs in terms of creativity, I’ve decided to start a small project. But what are the possible outcomes of starting your own project?
Failure. Nobody likes it, but it happens. This outcome depends on your skills and knowledge. But it tells us how not to do things, which is valuable experience as well.
Finished but unsuccesfull video game. Well, it is still nice addition to your portfolio that can help you to get a job.
Project closes to final stages of development and you still haven’t received any offer for a job in games industry? Well, we have more options at the final stages of development. I will definitely go for crowdfunding, like Kickstarter…etc (which is also aim of this project).
Defining possible outcomes is important step, as it helps me to prepare for each possible scenario. From my point of view, starting own project is win/win situation, nothing to lose. But there’s still a question that needs to be answered before planning stage. What is aim of this project? For this project, main focus is crowdfunding and possibility of founding my own studio in the future. My dream is to open a studio that would give chances to people with no academic background. As we could see in last couple years, even multi-billion giants like Google, IBM…etc. started dropping degree requirement for applicants. At the end, it is 21st century and information is freely accessible for everyone who is connected to the internet, and there are many great people who share their professional knowldge and experience for free. So, to make it short, aim of this project is not only to create a video game, but to create a video game that would help raise funds necessary to open a studio, studio that would primarily give chance to talented creatives with no academic background or degrees. But this blog is about creating video game, so let’s jump back on it.